mirror of
https://github.com/Kugelschieber/marvinblum.git
synced 2026-07-15 22:01:30 +00:00
Compare commits
3 Commits
bebb2f08f6
...
1f3767a99e
| Author | SHA1 | Date | |
|---|---|---|---|
| 1f3767a99e | |||
| c4f9ab96fc | |||
| 5965e07259 |
@@ -1 +1 @@
|
||||
console.log("Hello from Shifu!");
|
||||
console.log("Hi!");
|
||||
|
||||
@@ -2,8 +2,9 @@
|
||||
|
||||
$borderRadius: 8px;
|
||||
$textColor: #0f0f0f;
|
||||
$linkColor: #717171;
|
||||
$lightGray: #e6e6e6;
|
||||
$highlight: #82b3db;
|
||||
$highlight: #c0d9f0;
|
||||
|
||||
* {
|
||||
box-sizing: border-box;
|
||||
@@ -14,9 +15,8 @@ $highlight: #82b3db;
|
||||
}
|
||||
|
||||
body {
|
||||
padding: 80px 40px;
|
||||
max-width: 1000px;
|
||||
margin: 0 auto;
|
||||
margin: 0;
|
||||
padding: 0;
|
||||
}
|
||||
|
||||
h1, h2 {
|
||||
@@ -30,76 +30,140 @@ h1, h2 {
|
||||
}
|
||||
|
||||
h2 {
|
||||
margin: 40px 0;
|
||||
font-size: 26px;
|
||||
}
|
||||
|
||||
a {
|
||||
text-decoration: none;
|
||||
transition: all 0.3s;
|
||||
color: $highlight;
|
||||
color: $linkColor;
|
||||
|
||||
&:hover {
|
||||
color: $textColor;
|
||||
}
|
||||
}
|
||||
|
||||
p {
|
||||
margin: 20px 0;
|
||||
}
|
||||
|
||||
img {
|
||||
display: block;
|
||||
max-width: 80%;
|
||||
margin: 40px auto;
|
||||
}
|
||||
|
||||
pre {
|
||||
max-width: 80%;
|
||||
margin: 40px auto;
|
||||
padding: 20px;
|
||||
border-width: 1px 1px 1px 2px;
|
||||
border-style: solid;
|
||||
border-color: $highlight;
|
||||
border-radius: $borderRadius;
|
||||
overflow-x: auto;
|
||||
font-size: 14px;
|
||||
}
|
||||
|
||||
code {
|
||||
font-family: 'Courier New', Courier, monospace;
|
||||
}
|
||||
|
||||
hr {
|
||||
margin: 40px 0;
|
||||
height: 2px;
|
||||
background: $lightGray;
|
||||
border-width: 0;
|
||||
}
|
||||
|
||||
nav {
|
||||
display: flex;
|
||||
justify-content: space-between;
|
||||
align-items: center;
|
||||
margin: 0 0 80px 0;
|
||||
padding: 80px 40px;
|
||||
background: $highlight;
|
||||
|
||||
ul {
|
||||
.content {
|
||||
display: flex;
|
||||
gap: 20px;
|
||||
margin: 0;
|
||||
padding: 0;
|
||||
justify-content: space-between;
|
||||
align-items: center;
|
||||
max-width: 1000px;
|
||||
margin: 0 auto;
|
||||
|
||||
li {
|
||||
list-style: none;
|
||||
ul {
|
||||
display: flex;
|
||||
gap: 20px;
|
||||
margin: 0;
|
||||
padding: 0;
|
||||
|
||||
a {
|
||||
color: $textColor;
|
||||
li {
|
||||
list-style: none;
|
||||
margin: 0;
|
||||
padding: 0;
|
||||
|
||||
&:hover {
|
||||
color: $highlight;
|
||||
a {
|
||||
color: $textColor;
|
||||
|
||||
svg {
|
||||
fill: $textColor;
|
||||
transition: all 0.3s;
|
||||
}
|
||||
|
||||
&:hover {
|
||||
color: $linkColor;
|
||||
|
||||
svg {
|
||||
fill: $linkColor;
|
||||
}
|
||||
}
|
||||
}
|
||||
}
|
||||
}
|
||||
}
|
||||
|
||||
.contact {
|
||||
display: inline-block;
|
||||
padding: 8px 16px;
|
||||
border-radius: $borderRadius;
|
||||
border: 2px solid $highlight;
|
||||
color: $textColor;
|
||||
transition: all 0.3s;
|
||||
color: $highlight;
|
||||
.contact {
|
||||
display: inline-block;
|
||||
padding: 8px 16px;
|
||||
border-radius: $borderRadius;
|
||||
border: 2px solid $textColor;
|
||||
color: $textColor;
|
||||
transition: all 0.3s;
|
||||
|
||||
&:hover {
|
||||
background: $highlight;
|
||||
color: #fff;
|
||||
&:hover {
|
||||
background: $textColor;
|
||||
color: #fff;
|
||||
}
|
||||
}
|
||||
}
|
||||
}
|
||||
|
||||
section {
|
||||
margin: 0 0 80px 0;
|
||||
max-width: 1080px;
|
||||
margin: 80px auto 0 auto;
|
||||
padding: 0 40px;
|
||||
}
|
||||
|
||||
footer {
|
||||
margin: 0 0 80px 0;
|
||||
padding: 40px 0;
|
||||
border-style: solid;
|
||||
border-width: 2px 0 0 0;
|
||||
border-color: $lightGray;
|
||||
max-width: 1080px;
|
||||
margin: 80px auto 0 auto;
|
||||
padding: 0 40px;
|
||||
|
||||
.content {
|
||||
max-width: 1000px;
|
||||
margin: 0 auto;
|
||||
border-style: solid;
|
||||
border-width: 2px 0 0 0;
|
||||
border-color: $lightGray;
|
||||
padding: 40px 0;
|
||||
}
|
||||
}
|
||||
|
||||
.intro {
|
||||
background: $highlight;
|
||||
max-width: 100%;
|
||||
padding: 0 40px 80px 40px;
|
||||
margin: 0;
|
||||
|
||||
article {
|
||||
max-width: 1000px;
|
||||
margin: 0 auto;
|
||||
display: flex;
|
||||
gap: 40px;
|
||||
justify-content: flex-start;
|
||||
@@ -110,8 +174,8 @@ footer {
|
||||
}
|
||||
|
||||
img {
|
||||
max-width: 256px;
|
||||
max-height: 256px;
|
||||
max-width: 196px;
|
||||
max-height: 196px;
|
||||
aspect-ratio: 1;
|
||||
border-radius: $borderRadius;
|
||||
}
|
||||
|
||||
28
content/404.json
Normal file
28
content/404.json
Normal file
@@ -0,0 +1,28 @@
|
||||
{
|
||||
"path": {
|
||||
"en": "/404"
|
||||
},
|
||||
"sitemap": {
|
||||
"priority": "0.1"
|
||||
},
|
||||
"content": {
|
||||
"content": [
|
||||
{"ref": "head"},
|
||||
{"ref": "nav"},
|
||||
{
|
||||
"tpl": "text",
|
||||
"data": {
|
||||
"size": "h1"
|
||||
},
|
||||
"copy": {
|
||||
"en": {
|
||||
"headline": "404",
|
||||
"text": "<p>Whoops — this page does not exist.</p>"
|
||||
}
|
||||
}
|
||||
},
|
||||
{"ref": "footer"},
|
||||
{"ref": "end"}
|
||||
]
|
||||
}
|
||||
}
|
||||
16
content/blog.json
Normal file
16
content/blog.json
Normal file
@@ -0,0 +1,16 @@
|
||||
{
|
||||
"path": {
|
||||
"en": "/blog"
|
||||
},
|
||||
"sitemap": {
|
||||
"priority": "0.9"
|
||||
},
|
||||
"content": {
|
||||
"content": [
|
||||
{"ref": "head"},
|
||||
{"ref": "nav"},
|
||||
{"ref": "footer"},
|
||||
{"ref": "end"}
|
||||
]
|
||||
}
|
||||
}
|
||||
28
content/blog/dbtransactions.json
Normal file
28
content/blog/dbtransactions.json
Normal file
@@ -0,0 +1,28 @@
|
||||
{
|
||||
"path": {
|
||||
"en": "/blog/testing-database-transactions-in-go-jEaOGXravM"
|
||||
},
|
||||
"sitemap": {
|
||||
"priority": "0.6"
|
||||
},
|
||||
"content": {
|
||||
"content": [
|
||||
{"ref": "head"},
|
||||
{"ref": "nav"},
|
||||
{
|
||||
"tpl": "text",
|
||||
"data": {
|
||||
"size": "h1",
|
||||
"markdown": "/static/blog/go-db-transactions.md"
|
||||
},
|
||||
"copy": {
|
||||
"en": {
|
||||
"headline": "Testing Database Transactions in Go"
|
||||
}
|
||||
}
|
||||
},
|
||||
{"ref": "footer"},
|
||||
{"ref": "end"}
|
||||
]
|
||||
}
|
||||
}
|
||||
28
content/blog/emvi-blog.json
Normal file
28
content/blog/emvi-blog.json
Normal file
@@ -0,0 +1,28 @@
|
||||
{
|
||||
"path": {
|
||||
"en": "/blog/how-i-built-my-website-using-emvi-as-a-headless-cms-RGaqOqK18w"
|
||||
},
|
||||
"sitemap": {
|
||||
"priority": "0.6"
|
||||
},
|
||||
"content": {
|
||||
"content": [
|
||||
{"ref": "head"},
|
||||
{"ref": "nav"},
|
||||
{
|
||||
"tpl": "text",
|
||||
"data": {
|
||||
"size": "h1",
|
||||
"markdown": "/static/blog/emvi-blog.md"
|
||||
},
|
||||
"copy": {
|
||||
"en": {
|
||||
"headline": "How I Built My Website Using Emvi as a Headless CMS"
|
||||
}
|
||||
}
|
||||
},
|
||||
{"ref": "footer"},
|
||||
{"ref": "end"}
|
||||
]
|
||||
}
|
||||
}
|
||||
28
content/blog/golang-ids.json
Normal file
28
content/blog/golang-ids.json
Normal file
@@ -0,0 +1,28 @@
|
||||
{
|
||||
"path": {
|
||||
"en": "/blog/golang-transforming-ids-to-a-user-friendly-representation-in-web-applications-OxdzmRZ1Bl"
|
||||
},
|
||||
"sitemap": {
|
||||
"priority": "0.6"
|
||||
},
|
||||
"content": {
|
||||
"content": [
|
||||
{"ref": "head"},
|
||||
{"ref": "nav"},
|
||||
{
|
||||
"tpl": "text",
|
||||
"data": {
|
||||
"size": "h1",
|
||||
"markdown": "/static/blog/golang-ids.md"
|
||||
},
|
||||
"copy": {
|
||||
"en": {
|
||||
"headline": "Golang: Transforming IDs to a User-Friendly Representation in Web Applications"
|
||||
}
|
||||
}
|
||||
},
|
||||
{"ref": "footer"},
|
||||
{"ref": "end"}
|
||||
]
|
||||
}
|
||||
}
|
||||
28
content/blog/pirsch-update.json
Normal file
28
content/blog/pirsch-update.json
Normal file
@@ -0,0 +1,28 @@
|
||||
{
|
||||
"path": {
|
||||
"en": "/blog/a-quick-update-on-pirsch-me1VJzz1Xy"
|
||||
},
|
||||
"sitemap": {
|
||||
"priority": "0.6"
|
||||
},
|
||||
"content": {
|
||||
"content": [
|
||||
{"ref": "head"},
|
||||
{"ref": "nav"},
|
||||
{
|
||||
"tpl": "text",
|
||||
"data": {
|
||||
"size": "h1",
|
||||
"markdown": "/static/blog/pirsch-update.md"
|
||||
},
|
||||
"copy": {
|
||||
"en": {
|
||||
"headline": "A Quick Update on Pirsch"
|
||||
}
|
||||
}
|
||||
},
|
||||
{"ref": "footer"},
|
||||
{"ref": "end"}
|
||||
]
|
||||
}
|
||||
}
|
||||
28
content/blog/server-side-tracking.json
Normal file
28
content/blog/server-side-tracking.json
Normal file
@@ -0,0 +1,28 @@
|
||||
{
|
||||
"path": {
|
||||
"en": "/blog/server-side-tracking-without-cookies-in-go-OxdzmGZ1Bl"
|
||||
},
|
||||
"sitemap": {
|
||||
"priority": "0.6"
|
||||
},
|
||||
"content": {
|
||||
"content": [
|
||||
{"ref": "head"},
|
||||
{"ref": "nav"},
|
||||
{
|
||||
"tpl": "text",
|
||||
"data": {
|
||||
"size": "h1",
|
||||
"markdown": "/static/blog/server-side-tracking.md"
|
||||
},
|
||||
"copy": {
|
||||
"en": {
|
||||
"headline": "Server-Side Tracking Without Cookies In Go"
|
||||
}
|
||||
}
|
||||
},
|
||||
{"ref": "footer"},
|
||||
{"ref": "end"}
|
||||
]
|
||||
}
|
||||
}
|
||||
28
content/blog/vue3.json
Normal file
28
content/blog/vue3.json
Normal file
@@ -0,0 +1,28 @@
|
||||
{
|
||||
"path": {
|
||||
"en": "/blog/my-experience-with-vue-3-and-typescript-so-far-bZ1DQzJdjK"
|
||||
},
|
||||
"sitemap": {
|
||||
"priority": "0.6"
|
||||
},
|
||||
"content": {
|
||||
"content": [
|
||||
{"ref": "head"},
|
||||
{"ref": "nav"},
|
||||
{
|
||||
"tpl": "text",
|
||||
"data": {
|
||||
"size": "h1",
|
||||
"markdown": "/static/blog/vue3.md"
|
||||
},
|
||||
"copy": {
|
||||
"en": {
|
||||
"headline": "My Experience With Vue 3 and Typescript So Far"
|
||||
}
|
||||
}
|
||||
},
|
||||
{"ref": "footer"},
|
||||
{"ref": "end"}
|
||||
]
|
||||
}
|
||||
}
|
||||
28
content/blog/wildcard-ssl-certificates.json
Normal file
28
content/blog/wildcard-ssl-certificates.json
Normal file
@@ -0,0 +1,28 @@
|
||||
{
|
||||
"path": {
|
||||
"en": "/blog/wildcard-ssl-certificates-on-kubernetes-using-acme-dns-0odQzebaLO"
|
||||
},
|
||||
"sitemap": {
|
||||
"priority": "0.6"
|
||||
},
|
||||
"content": {
|
||||
"content": [
|
||||
{"ref": "head"},
|
||||
{"ref": "nav"},
|
||||
{
|
||||
"tpl": "text",
|
||||
"data": {
|
||||
"size": "h1",
|
||||
"markdown": "/static/blog/wildcard-ssl-certificates.md"
|
||||
},
|
||||
"copy": {
|
||||
"en": {
|
||||
"headline": "Wildcard SSL Certificates on Kubernetes Using ACME DNS"
|
||||
}
|
||||
}
|
||||
},
|
||||
{"ref": "footer"},
|
||||
{"ref": "end"}
|
||||
]
|
||||
}
|
||||
}
|
||||
@@ -8,9 +8,20 @@
|
||||
"content": {
|
||||
"content": [
|
||||
{"ref": "head"},
|
||||
{"ref": "nav"},
|
||||
{
|
||||
"tpl": "intro"
|
||||
},
|
||||
{
|
||||
"tpl": "text",
|
||||
"copy": {
|
||||
"en": {
|
||||
"headline": "TODO",
|
||||
"text": "<ul><li>About</li><li>Skills</li><li>Projects</li><li>Work Experience</li><li>Hire me!</li></ul>"
|
||||
}
|
||||
}
|
||||
},
|
||||
{"ref": "footer"},
|
||||
{"ref": "end"}
|
||||
]
|
||||
}
|
||||
|
||||
16
content/legal.json
Normal file
16
content/legal.json
Normal file
@@ -0,0 +1,16 @@
|
||||
{
|
||||
"path": {
|
||||
"en": "/legal"
|
||||
},
|
||||
"sitemap": {
|
||||
"priority": "0.1"
|
||||
},
|
||||
"content": {
|
||||
"content": [
|
||||
{"ref": "head"},
|
||||
{"ref": "nav"},
|
||||
{"ref": "footer"},
|
||||
{"ref": "end"}
|
||||
]
|
||||
}
|
||||
}
|
||||
3
content/refs/footer.json
Normal file
3
content/refs/footer.json
Normal file
@@ -0,0 +1,3 @@
|
||||
{
|
||||
"tpl": "footer"
|
||||
}
|
||||
3
content/refs/nav.json
Normal file
3
content/refs/nav.json
Normal file
@@ -0,0 +1,3 @@
|
||||
{
|
||||
"tpl": "nav"
|
||||
}
|
||||
126
static/blog/emvi-blog.md
Normal file
126
static/blog/emvi-blog.md
Normal file
@@ -0,0 +1,126 @@
|
||||
**Published on 14. June 2020**
|
||||
|
||||
Welcome to my blog! My name is Marvin, I'm a software engineer and entrepreneur. I write about programming, servers, my work and everything I'm interested in. In my first blog post, I would like to show you how I build my website and the tools I used. You already guessed that from the title I suppose.
|
||||
|
||||
You can find the full source code for my website on [GitHub](https://github.com/Kugelschieber/marvinblum). It's MIT licensed, so you can build your own on top of it or just reuse parts of the code.
|
||||
|
||||
Goals
|
||||
-----
|
||||
|
||||
So first of all, here are the goals I set when I started:
|
||||
|
||||
* the page must be self hosted, I do like to have full control
|
||||
* it must be fast and have a small footprint
|
||||
* easy to deploy on cheap hardware
|
||||
* I don't want to put too much thought and time into styling
|
||||
* enable me to write articles without having to change the page itself, but don't require me to install (and update!) a full fledged CMS at the same time
|
||||
|
||||
|
||||
The last point is probably the most important one to me. My page won't change very frequently and I don't want to maintain a CMS. I also don't want to write a template for any CMS out there, as that quickly gets out of hand and is not worth the effort. Static HTML won't do it neither, as the blog articles need to be updated as soon as I release a new one or change an existing one.
|
||||
|
||||
Lets go through the bullet points and the choices I made. The most interesting part is probably how I build the blog.
|
||||
|
||||
Server and Deployment
|
||||
---------------------
|
||||
|
||||
For hosting, I chose [Hetzner](https://www.hetzner.com/) as a cloud provider. The Hetzner cloud offers virtual machines, block storage and networking (subnets, floating IPs, ...). There is an API too, which can be used to automate things.
|
||||
|
||||
My website is hosted on the smallest VM (CX11-CEPH) for 2,96 €/month, which is insanely cheap. It provides a single vCPU, 2GB RAM and 20GB storage. Which is sufficient for my simple page. I chose a CEPH machine, as this will store all data on block storage rather than on the machine itself, which decouples it from the hardware. In case of a hardware fault, Hetzner will boot up my server on a different machine and I won't have to do anything. I'm not sure if it assigns a different IP to the server in that case. For the OS I chose Ubuntu as I use that on my computer and I'm familiar with it.
|
||||
|
||||
The software running my page is a custom server I build using [Go](https://golang.org/) (golang), as it is an excellent programming language and offers high performance. I will go into more detail about the code in a second.
|
||||
|
||||
I use Docker and Compose to deploy my page. Both are well established tools to package and deploy software. These are the only tools I installed on the VM, so I just need to update the systems packages through _apt_ from time to time. Within the `docker-compose.yml` I added [Traefik](https://containo.us/traefik/) as a reverse proxy to schedule a SSL certificate from Letsencrypt.
|
||||
|
||||
Deploying my page is now as simple as building and pushing the Docker image, pulling it on the server and restarting the container. Of course you could automate that whole process so that the page updates itself, but again: I won't change the content frequently. So that's good enough.
|
||||
|
||||
Structure and Static Content
|
||||
----------------------------
|
||||
|
||||
Lets taking a look at the directory structure:
|
||||
|
||||
* blog - code to load and cache blog articles
|
||||
* static - static files (my picture, stylesheets, ...) and used to cache blog article attachments (more on that later)
|
||||
* template - contains the HTML files to build the page
|
||||
* tpl - code to load and build the page from the template files
|
||||
|
||||
|
||||
The root directory contains the `main.go` to wire everything up and set up the router, as well as the `Dockerfile`, `docker-compose.yml` and the Go dependencies (`go.mod`). Everything within the `static` directory is served as static content on the `/static/...` route. Each page has it's own handler function which assembles the HTML using the template files.
|
||||
|
||||
Another point worth mentioning is gzip compression. I added the `gziphandler.GzipHandler` on the static route to compress files. The middleware is build by the New York Times and easy to integrate. You can check it out [here](https://github.com/nytimes/gziphandler).
|
||||
|
||||
Styling
|
||||
-------
|
||||
|
||||
As I do like to keep things simple, I chose a micro CSS framework so that I don't have to bother with styling too much. Namely [concrete](https://concrete.style/), which I adjusted a bit, to narrow the layout and add a header with my picture. Apart from that I'm quite pleased with the look of it. As a bonus, it also switches to dark mode automatically if you set that in your (OS) preferences.
|
||||
|
||||
Templating
|
||||
----------
|
||||
|
||||
To prevent writing the same HTML over and over again I made use of Go's template system. It's simple but powerful enough for most websites and you can extend it using function maps. Here is an example for the blog article page (the one you're looking at right now):
|
||||
|
||||
```
|
||||
{{"{{"}}template "head.html"{{"}}"}}
|
||||
{{"{{"}}template "menu.html"{{"}}"}}
|
||||
|
||||
<section>
|
||||
<h1>{{"{{"}}.Title{{"}}"}}</h1>
|
||||
<small>Published on {{"{{"}}format .Published "2. January 2006"{{"}}"}}</small>
|
||||
{{"{{"}}.Content{{"}}"}}
|
||||
</section>
|
||||
|
||||
{{"{{"}}template "end.html"{{"}}"}}
|
||||
```
|
||||
|
||||
`head`, `menu` and `end` are reused on all pages.
|
||||
|
||||
I've added two functions to format dates and build the blog article slug from the title:
|
||||
|
||||
```
|
||||
var funcMap = template.FuncMap{
|
||||
"slug": slug.Make,
|
||||
"format": func(t time.Time, layout string) string {
|
||||
return t.Format(layout)
|
||||
},
|
||||
}
|
||||
```
|
||||
|
||||
Blog
|
||||
----
|
||||
|
||||
[Emvi](https://emvi.com/) offers an API which allows anyone to use it as a headless CMS. The main advantage of it is, that I can use its editor to write my blog articles, upload images/files and don't need to worry about hosting my own CMS. Apart from that I'm using Emvi for note taking and documentation anyways, so I can stay on the same platform.
|
||||
|
||||
To read articles, I make use of the [Go client library](https://github.com/emvi/api-go). It isn't complete yet, as Emvi is still in beta, but provides everything required to build a blog. On top of it I build my own type to cache articles and files and sort them into maps, which are rendered on my page later. You could just use the client to do all of that without caching, but to reduce latency and serve articles in case Emvi goes down for some reason, I thought that would be a good idea.
|
||||
|
||||
```
|
||||
type Blog struct {
|
||||
client *emvi.Client
|
||||
articles map[string]emvi.Article // id -> article
|
||||
articlesYear map[int][]emvi.Article // year -> articles
|
||||
nextUpdate time.Time
|
||||
}
|
||||
```
|
||||
|
||||
The `client` is initialized with the client ID and secret I generated within Emvi, as well as the name of my organization. These are configured using environment variables, so that I can put them into the `docker-compose.yml`. `nextUpdate` is used to refresh the cache after some time. Articles and files will only be updated in case they have changed since the last time they have been accessed. The article content itself is cached in memory, files are stored on disk.
|
||||
|
||||
Articles are put into two different maps. The first one is used to access any article by ID. The ID is read from the slug within the URL to render an article. The second map groups all articles by year, which is used to display them on the blogs overview page.
|
||||
|
||||
Note that you need to set an article to "external" within Emvi to allow it to be read through the API. To prevent reading articles which do not belong to my blog, I filtered the results by the tag "blog" and sort them in descending order:
|
||||
|
||||
```
|
||||
results, _, err = blog.client.FindArticles("", &emvi.ArticleFilter{
|
||||
BaseSearch: emvi.BaseSearch{Offset: offset},
|
||||
Tags: "blog",
|
||||
SortPublished: emvi.SortDescending,
|
||||
})
|
||||
```
|
||||
|
||||
The offset is provided to read articles in a loop, as you can only read a fixed amount of results in one call. Afterwards, the content and files are read and cached for all results. I also added some regex to replace the paths within the content of each article to read images and files from my page instead of accessing Emvi.
|
||||
|
||||
And that's pretty much it. If you now visit my website, it will extract the ID from the URL, look up the cache, update it if required and return the result to you.
|
||||
|
||||
Conclusion
|
||||
----------
|
||||
|
||||
Personal blogging is something I love about the internet and I now started my own blog. In terms of cost, running this page costs me 2,96 €/month for the server and 5$/month for Emvi (also I'm not paying for it as I'm the co-founder) plus something for the domain, which is insignificant. The solution I chose is fun and easy to implement, but certainly not suitable for non-programmers. I hope I can provide a plug and play solution in the future. It will most likely also use Emvi, as we are turning it into a platform for all sorts of different applications.
|
||||
|
||||
In case you would like to send me feedback or have a question, you can contact me by [mail](mailto:marvin@marvinblum.de) or on [Twitter](https://twitter.com/m5blum).
|
||||
43
static/blog/go-db-transactions.md
Normal file
43
static/blog/go-db-transactions.md
Normal file
@@ -0,0 +1,43 @@
|
||||
**Published on 28. August 2020**
|
||||
|
||||
You can find a lot of articles about how to prevent deadlocks in Go, but most of them focus on concurrency patterns and synchronization tools like mutexes. While it is important to know some techniques to prevent them, a trap you can stumble across more easily without noticing, are database transaction deadlocks.
|
||||
|
||||
A transaction deadlock can occur when you start one or more transactions and run queries outside of transactions while they are still active. If you run too many transactions and queries at the same time, you might run out of database connections in the connection pool. Here is a simple example of that:
|
||||
|
||||
```
|
||||
// We will ignore errors for this example,
|
||||
// you should always check them of course.
|
||||
|
||||
tx, _ := db.Begin()
|
||||
tx.Exec(`INSERT INTO "foo" ("a", "b") VALUES (4, 2)`)
|
||||
|
||||
// ...
|
||||
|
||||
db.Query(`SELECT * FROM "foo" WHERE "a" = $1 AND "b" = $2`, 4, 2)
|
||||
|
||||
// DEADLOCK
|
||||
|
||||
tx.Commit()
|
||||
```
|
||||
|
||||
In this example, we create a new transaction and insert something to the database. Later on, we try to query the same result from the database. That the inserted row has not been committed yet, is not the actual issue, as you would receive no result in that case. The real issue here is that if you run this code concurrently, you might run out of connections. How many connections are opened to the database can be configured. As soon as your code reaches the `db.Query` the last connection might be occupied by the transaction and therefore blocks until a connection is available, which might never happen.
|
||||
|
||||
So how do you fix this? First of all, all queries should be run either outside or inside a transaction for a specific part of your code. Even if you run a transaction block and a non-transaction block concurrently, the non-transaction block will not be blocked by the transaction forever (but the non-transaction block might need to wait for the other part to finish). Additionally, you can use a linter or another tool to make sure all queries are run completely inside or outside of transactions.
|
||||
|
||||
I usually write integration tests against the database. If you do the same, you can configure the connection pool size to make sure the tests will only use a single connection. That way the tests will run into a deadlock should you have forgotten to use a transaction somewhere. You can easily configure that inside the `TestMain` function for a package.
|
||||
|
||||
```
|
||||
func TestMain(m *testing.M) {
|
||||
db.SetMaxOpenConns(1) // db is the *sql.DB created somewhere
|
||||
}
|
||||
```
|
||||
|
||||
I hope this helps you to prevent some nasty deadlock bugs. I found quite a few in a larger code base by limiting the connection pool. In production, you should use multiple connections to speed up things of course.
|
||||
|
||||
* * *
|
||||
|
||||
Would you like to see more? Read my blog articles on [Emvi](https://emvi.com/blog), my project page on [GitHub](https://github.com/Kugelschieber) or send me a [mail](mailto:marvin@marvinblum.de).
|
||||
|
||||
This page uses [concrete](https://concrete.style/) for styling. Check it out!
|
||||
|
||||
This page does not use cookies. [Legal](https://marvinblum.de/legal)
|
||||
201
static/blog/golang-ids.md
Normal file
201
static/blog/golang-ids.md
Normal file
@@ -0,0 +1,201 @@
|
||||
**Published on 7. July 2020**
|
||||
|
||||
> _This post was originally published on Medium a while ago. I just added it to my blog for completeness._
|
||||
|
||||

|
||||
|
||||
Most Golang web applications use persistency in some way or another. Usually, the connection between your application and the persistent layer is a technical identification value (ID), a number in most cases. IDs are useful to identify, connect and distinguish data records. Here is a typical example of a database model represented as a struct within Golang applications:
|
||||
|
||||
```
|
||||
type Customer struct {
|
||||
Id int64 `json:"id"`
|
||||
Email string `json:"email"`
|
||||
Username string `json:"username"`
|
||||
}
|
||||
```
|
||||
|
||||
|
||||
This struct can easily be used to retrieve and store customers in a database as well as handling customer data within your business logic. What if we add a REST endpoint to show the customers data on a website?
|
||||
|
||||
```
|
||||
router.HandleFunc("/customer", func(w http.ResponseWriter, r* http.Request) {
|
||||
customer := findCustomer(r)
|
||||
response, _ := json.Marshal(customer)
|
||||
w.Write(response)
|
||||
})
|
||||
```
|
||||
|
||||
|
||||
Calling this endpoint will return the customer object as JSON within the body:
|
||||
|
||||
```
|
||||
{
|
||||
"id": 123,
|
||||
"email": "foo@bar.com",
|
||||
"username":"foobar"
|
||||
}
|
||||
```
|
||||
|
||||
|
||||
As you can see, we received the customer object as expected. There is the email address, the username and the ID, which can be used to perform certain actions, like updating the customers username with a PUT request. We modify our endpoint to do so:
|
||||
|
||||
```
|
||||
router.HandleFunc("/customer", func(w http.ResponseWriter, r* http.Request) {
|
||||
if r.Method == "GET" {
|
||||
customer := findCustomer(r)
|
||||
response, _ := json.Marshal(customer)
|
||||
w.Write(response)
|
||||
} else if r.Method == "PUT" {
|
||||
request := struct {
|
||||
UserId int64 `json:"id"`
|
||||
Username string `json:"username"`
|
||||
}{}
|
||||
decoder := json.NewDecoder(r.Body)
|
||||
if err := decoder.Decode(&request); err != nil {
|
||||
w.WriteHeader(http.StatusBadRequest)
|
||||
}
|
||||
if err := updateCustomer(request.UserId, request.Username); err != nil {
|
||||
w.WriteHeader(http.StatusBadRequest)
|
||||
}
|
||||
}
|
||||
})
|
||||
```
|
||||
|
||||
|
||||
Our handler accepts two methods now: GET and PUT. GET will return the customer, just like before. PUT reads the body send with the request and passes the parameters to a function updating the customer. As you can see we’ve used the ID field to identify the customer. This is a nice and simple approach to identify the customer again. So, what’s bad about all of this?
|
||||
|
||||
First of all: If your IDs are generated auto-incremented numbers, from a security standpoint, it’s fine to expose IDs to anyone.
|
||||
|
||||
On the other side: You probably don’t want to show users long boring numbers, that are hard to remember. YouTube for example uses short strings to represent a video: ?v=hY7m5jjJ9mM. This representation does not only look better in the URL, but it also hides technical IDs within their system. Another reason might be, that you don’t want to show how many records of an object exist if you use auto-incremented numbers starting at one. There are more reasons to hide technical IDs from your users, like splitting ID ranges, migrations, and so on. But I don’t want to go into too much detail here.
|
||||
|
||||
Take a look at this nice article by John Topley why you shouldn’t expose IDs to your users.
|
||||
|
||||
[
|
||||
|
||||
Database IDs Have No Place In URIs
|
||||
|
||||
https://johntopley.com/2008/08/19/database-ids-have-no-place-in-uris/
|
||||
|
||||
|
||||
|
||||
](https://johntopley.com/2008/08/19/database-ids-have-no-place-in-uris/)
|
||||
|
||||
At this point, it should be clear we’re looking for a simple and flexible solution for this issue. But how can we transform our IDs to a more user-friendly representation without changing too much of our existing code? The solution to this (as often in Golang): interfaces.
|
||||
|
||||
Instead of using int64 as our ID type, we can establish our own type and implement the interfaces needed to transform IDs into a different form. Since this article is about web applications, I assume there is (un-)marshaling to and from JSON, a database and business logic that deals with IDs. The approach I’m about to show you works for all kinds of requirements.
|
||||
|
||||
First of all, we declare a custom ID type:
|
||||
|
||||
```
|
||||
type ID int64
|
||||
```
|
||||
|
||||
|
||||
As you can see, this is a simple one liner. And actually just a fancy name for an int64. In our application we want this to be returned as a hash string to the user - representing the same number - but still be a number when dealing with it internally. We have to attach a few methods to make it work.
|
||||
|
||||
Let’s beginn by satisfying the [Marshaler](https://golang.org/pkg/encoding/json/#Marshaler) and [Unmarshaler](https://golang.org/pkg/encoding/json/#Unmarshaler) interfaces of the standard library first:
|
||||
|
||||
```
|
||||
// MarshalJSON implements the encoding json interface.
|
||||
func (this ID) MarshalJSON() ([]byte, error) {
|
||||
if this == 0 {
|
||||
return json.Marshal(nil)
|
||||
} result, err := hash.Encode(this) if err != nil {
|
||||
return nil, err
|
||||
} return json.Marshal(string(result))
|
||||
}// UnmarshalJSON implements the encoding json interface.
|
||||
func (this *ID) UnmarshalJSON(data []byte) error {
|
||||
// convert null to 0
|
||||
if strings.TrimSpace(string(data)) == "null" {
|
||||
*this = 0
|
||||
return nil
|
||||
} // remove quotes
|
||||
if len(data) >= 2 {
|
||||
data = data[1 : len(data)-1]
|
||||
} result, err := hash.Decode(data) if err != nil {
|
||||
return err
|
||||
} *this = ID(result)
|
||||
return nil
|
||||
}// remove quotes
|
||||
if len(data) >= 2 {
|
||||
data = data[1 : len(data)-1]
|
||||
}result, err := hash.Decode(data)if err != nil {
|
||||
return err
|
||||
}*this = ID(result)
|
||||
return nil
|
||||
}
|
||||
```
|
||||
|
||||
|
||||
By adding these two methods, our ID type now translates to a hash string when it is marshalled and will be converted back to its integer representation when unmarshalled. Of course, in order for this to work, our hash function must be symmetric. You can use [HashIds](https://github.com/speps/go-hashids) for example.
|
||||
|
||||
Within the PUT endpoint, we can now replace the ID in the request object with our custom type:
|
||||
|
||||
```
|
||||
request := struct {
|
||||
UserId ID `json:"id"`
|
||||
Username string `json:"username"`
|
||||
}{}
|
||||
```
|
||||
|
||||
|
||||
Appart from that, you have to change the parameter in the updateCustomer function or cast it to an int64:
|
||||
|
||||
```
|
||||
updateCustomer(int64(request.UserId), request.Username)
|
||||
```
|
||||
|
||||
|
||||
All that’s left to do now, is implementing the [Scanner](https://golang.org/pkg/database/sql/#Scanner) and [Valuer](https://golang.org/pkg/database/sql/driver/#Valuer) interface to persist our custom ID type within databases:
|
||||
|
||||
```
|
||||
// Scan implements the Scanner interface.
|
||||
func (this *ID) Scan(value interface{}) error {
|
||||
if value == nil {
|
||||
*this = 0
|
||||
return nil
|
||||
}
|
||||
|
||||
id, ok := value.(int64)
|
||||
|
||||
if !ok {
|
||||
return errors.New("unexpected type")
|
||||
}
|
||||
|
||||
*this = ID(id)
|
||||
return nil
|
||||
}
|
||||
|
||||
// Value implements the driver Valuer interface.
|
||||
func (this ID) Value() (driver.Value, error) {
|
||||
return int64(this), nil
|
||||
}
|
||||
```
|
||||
|
||||
|
||||
As you can see this is as simple as converting to int64, because the database driver expects all types to satisfy the [Value](https://golang.org/pkg/database/sql/driver/#Value) interface. We can now change the type of our customer ID to complete our changes:
|
||||
|
||||
```
|
||||
type Customer struct {
|
||||
Id ID `json:"id"`
|
||||
Email string `json:"email"`
|
||||
Username string `json:"username"`
|
||||
}
|
||||
```
|
||||
|
||||
|
||||
And that’s it! If you want to know more about how to implement this or just use it right away, you can visit the GitHub project, which implements all of the functionality I’ve shown above. It uses HashIds, which I’ve mentioned earlier, to transform the IDs to a nice and short hash representation.
|
||||
|
||||
[
|
||||
|
||||

|
||||
|
||||
emvi/hide
|
||||
|
||||
ID type with marshalling to/from hash to prevent sending IDs to clients. - emvi/hide
|
||||
|
||||
https://github.com/emvi/hide
|
||||
|
||||
|
||||
|
||||
](https://github.com/emvi/hide)
|
||||
25
static/blog/pirsch-update.md
Normal file
25
static/blog/pirsch-update.md
Normal file
@@ -0,0 +1,25 @@
|
||||
**Published on 3. July 2020**
|
||||
|
||||
Pirsch is a great success so far. At least that is what I would call it from looking at the [traffic](https://marvinblum.de/tracking) on my website and the stars on [GitHub](https://github.com/emvi/pirsch). A few people on [Hacker News](https://news.ycombinator.com/item?id=23668212) pointed out some details you should know in case you're using it.
|
||||
|
||||
> You can find a detailed article about server side tracking in Go [here](https://marvinblum.de/blog/server-side-tracking-without-cookies-in-go-OxdzmGZ1Bl).
|
||||
|
||||
Legal Stuff
|
||||
-----------
|
||||
|
||||
While it is not possible to tell _who_ visited your website, it's still a good idea to mention tracking on your terms and conditions page (or whatever you call it). I'm not a lawyer, but the GDPR covers tracking methods that don't use cookies. You won't need a cookie banner (consent) as far as I can tell, because Pirsch does not collect personal data, which is one of the main goals I wanted to achieve, but as I said, I'm not a lawyer.
|
||||
|
||||
Fingerprinting
|
||||
--------------
|
||||
|
||||
Another point that came up is how Pirsch generates fingerprints. The method is fine, it's just that it had one issue: the algorithm is open source and there is no randomness. Let me explain: if someone gets access to the fingerprints you generated, he could theoretically generate identical fingerprints for visitors to other websites, and therefore tell which websites a user visited by comparing them. I fixed this issue in release v1.1.0 by adding a salt you define. It should be set to something no one can guess and be treated like a password.
|
||||
|
||||
Filtering Bots
|
||||
--------------
|
||||
|
||||
Additionally to the change above I extended the bot keyword list. It now includes everything that should not occur inside the User-Agent header. It now contains 365 entries, which should be enough to filter the most unwanted traffic.
|
||||
|
||||
Conclusion
|
||||
----------
|
||||
|
||||
Thank you, everyone, for all the helpful feedback! I would love to hear if you're using it and how well it works for you. Just send me a mail using the button (Contact me) at the top.
|
||||
114
static/blog/server-side-tracking.md
Normal file
114
static/blog/server-side-tracking.md
Normal file
@@ -0,0 +1,114 @@
|
||||
**Published on 22. June 2020**
|
||||
|
||||
I was looking for an alternative to Google Analytics to track visitors on a website. Analytics (and most of its competitors) provide detailed information and real-time data at the cost of privacy. Google can track you across sites using a bunch of different techniques and through their Chrome browser. Combined, this can be assembled to a detailed profile that can not only be used for tracking, but for marketing too.
|
||||
|
||||
I found some (open source) alternatives like [GoatCounter](https://www.goatcounter.com/), which anonymously collect data without invading the user's privacy. But all of the tools I found either rely on cookies, which the visitor needs to opt-in for or cost money for the server-side only tracking solution. While I'm willing to pay for good software, especially when it comes from a small team or just one developer, I was wondering if I could build something that I can integrate into my Go applications.
|
||||
|
||||
This post is about my solution called _Pirsch_, an open-source Go library that can be integrated into your applications to tracks visitors on the server-side, without setting cookies. I will write about the technique used and what the advantages and disadvantages are.
|
||||
|
||||
> TL;DR
|
||||
> -----
|
||||
>
|
||||
> Invading the privacy of your website visitors is evil. Pirsch is a privacy-focused tracking library for Go that can be integrated into your applications. Check it out on [GitHub](https://github.com/emvi/pirsch)!
|
||||
>
|
||||
> You can find a live demo [here](https://marvinblum.de/tracking) on my website and the whole thing on GitHub as a [sample application](https://github.com/Kugelschieber/marvinblum).
|
||||
|
||||
What's With the Name?
|
||||
---------------------
|
||||
|
||||
Pirsch is German and refers to a special kind of hunt: _the hunter carefully and quietly enters the area to be hunted, he stalks against the wind in order to get as close as possible to the prey without being noticed._
|
||||
|
||||
I found this quite fitting for a tracking library that cannot be blocked by the visitor. Even though it sounds a little sneaky. Here is the Gopher for it created by [Daniel](https://github.com/Motorschpocht).
|
||||
|
||||

|
||||
|
||||
How Does It Work?
|
||||
-----------------
|
||||
|
||||
I will go over each step in more detail later, but here is a high-level overview of how Pirsch tracks visitors.
|
||||
|
||||

|
||||
|
||||
Once someone visits your website, the HTTP handler calls Pirsch to store a new hit and goes on with whatever it intends to do. Pirsch will do its best to filter out bots, calculate a fingerprint, and stores the page hit. You can analyze the data and generate statistics from it later.
|
||||
|
||||
The process must be triggered manually by calling the `Hit` method and passing the `http.Request`. This enables you to decide which traffic is tracked and which is not. I'm usually just interested in page visits, so I'll add a call to Pirsch inside my page handlers. Resources are served on a different endpoint and won't be tracked that way.
|
||||
|
||||
### Fingerprinting
|
||||
|
||||
Fingerprinting is a technique to identify individual devices by combing some parameters. The parameters are typically things like the graphics card ID and other variables that are unique to a device. As we are interested in tracking website traffic, we won't have access to this kind of information. Instead, we can make use of the IP and HTTP protocol. Here are the parameters used by Pirsch to generate a fingerprint:
|
||||
|
||||
* the IP is the most obvious choice. It might change, as ISPs only have a limited pool of IPs available to them, but that shouldn't happen too frequently
|
||||
|
||||
* the User-Agent HTTP header contains information about the browser and device used by the visitor. It might not be filled though, but it usually is
|
||||
|
||||
|
||||
To generate a unique fingerprint from this information, we can calculate a hash. Pirsch will add the current day to prevent tracking users across days and calculate an MD5 hash. I found this to be the fastest algorithm available in the Go standard library. This will also make the visitor anonymous at the same time as we do not store IPs or other identifiable information.
|
||||
|
||||
This method is called _passive_ fingerprinting, as we're only using data that we have access to anyways. The alternative is called _active_ fingerprinting, which makes use of JavaScript to collect additional information on the client-side and sends it to the backend. But as we're trying to build a privacy-focus tracking solution, passive fingerprinting is the way to go.
|
||||
|
||||
We will use the fingerprint later to count unique visitors.
|
||||
|
||||
### Filtering Bots
|
||||
|
||||
Filtering out bot traffic is hard, as there is no complete list of all bots and they won't send any special kind of information, like an _I'm a bot_ header. All we can do is to process the IP and the User-Agent header send and make some assumptions. Pirsch will look for terms often used by bots within the User-Agent header. Should it contain words like _bot_ or _crawler_ or an URL, the hit will be dropped. Filtering for IP ranges is not implemented (yet), but you can filter hits that are coming from popular IP ranges, like AWS.
|
||||
|
||||
### Hits
|
||||
|
||||
Each page request is stored as a _Hit_. A hit is a data point that can later be analyzed. Here is the definition of a hit:
|
||||
|
||||
```
|
||||
// I removed some details to make it more readable for this blog post
|
||||
type Hit struct {
|
||||
Fingerprint string
|
||||
Path string
|
||||
URL string
|
||||
Language string
|
||||
UserAgent string
|
||||
Ref string
|
||||
Time time.Time
|
||||
}
|
||||
```
|
||||
|
||||
|
||||
A hit contains the full request URL, the path extracted from the URL, the language, user-agent and reference passed by the client in their corresponding headers and the time the request was made.
|
||||
|
||||
### Analyze
|
||||
|
||||
Pirsch provides an _Analyzer_ that can be used to extract some basic statistics:
|
||||
|
||||
* total visitor count
|
||||
|
||||
* visitors by page on each day
|
||||
|
||||
* visitors by hour on each day
|
||||
|
||||
* languages used by visitors
|
||||
|
||||
* active visitors within a time frame
|
||||
|
||||
|
||||
Most of these functions accept a filter to specify a time frame. The data can then be plotted like on my [tracking page](https://marvinblum.de/tracking).
|
||||
|
||||

|
||||
|
||||
To reduce the amount of data that needs to be processed the hits get aggregated each night and hits are cleaned up afterward.
|
||||
|
||||
Postgres is used as the storage backend at the moment as it is a fantastic open-source database and provides all features needed to read these statistics easily. You can extract more statistics, like the visitor page flow, from the database if you care.
|
||||
|
||||
### Tracking From JavaScript
|
||||
|
||||
While it is simple to integrate tracking into your backend, you might also want to have some way to track from your frontend as well, in case you're running a single page application for example. In that case, you can add an endpoint to your router and call it using Ajax. The path can manually be overwritten in Pirsch by calling _HitPage_ instead of _Hit_.
|
||||
|
||||
How Well Does It Work?
|
||||
----------------------
|
||||
|
||||
As far as I can tell right now, it works pretty well. I still need to collect more sample data and a way to compare it to something like Google Analytics in order to make a more precise statement. Keep in mind that while Analytics and other tools provide more detailed statistics, like the location, age, gender, and so on, they can be blocked by tools like uBlock. Pirsch cannot be blocked by the client and therefore it can track visitors you won't even notice with a client-side solution.
|
||||
|
||||
Bots are probably the weak spot of Pirsch right now, as filtering for them requires adding a whole bunch of keywords to the filter list.
|
||||
|
||||
Another disadvantage of server-side tracking depending on your use-case might be that you cannot track your marketing campaigns. In case you're using Adsense for marketing, you can track how well your campaigns perform through Analytics. This won't work with Pirsch.
|
||||
|
||||
Conclusion
|
||||
----------
|
||||
|
||||
Tracking on the server-side isn't too hard to archive and all in all, I think it's worth the effort. I hope you gained some insight into how you can use fingerprinting and Pirsch to your advantage. I will continue improving Pirsch and implement it into [Emvi](https://emvi.com/) and compare the output to Analytics. I might also add a user interface for Pirsch so that you can host it without integrating it into your application and without the need to generate the charts yourself. In case you would like to send me feedback, have a question, or would like to contribute you can contact me.
|
||||
290
static/blog/vue3.md
Normal file
290
static/blog/vue3.md
Normal file
@@ -0,0 +1,290 @@
|
||||
**Published on 22. October 2020**
|
||||
|
||||
I recently started working on the user interface for [Pirsch](https://pirsch.io/) and was very happy to hear that Vue 3 [has been officially released](https://news.vuejs.org/issues/186) and marked production-ready. While most of the other core libraries, like vue-router and vuex, are still in beta, I didn't want to build upon Vue 2. Don't get me wrong, Vue 2 is a great framework and stable, but I wasn't satisfied with my approach to building frontends anymore.
|
||||
|
||||
This article is about the transition to a new project setup, my first steps in Vue 3, and the experiences I made using it together with TypeScript. I will provide code samples and highlight a few features I found useful and refreshing.
|
||||
|
||||
Some Background
|
||||
---------------
|
||||
|
||||
I started learning Vue back when they made the transition from version 1 to 2 and I quickly built my own setup, ignoring the default way of setting up a project through the vue-cli. This time, however, I wanted to just use what's there and not wrap my head around setting up stuff like webpack. Additionally, I wanted to try out TypeScript, something I have shied away from for a long time, mostly because I believed it would add an additional layer of abstraction on top of vanilla JavaScript, which seemed unnecessary to me. And as we recently started developing a new product called [Pirsch](https://pirsch.io/), which has a fairly simple frontend, I took the opportunity to try out something new. As I'm a beginner with TypeScript, please let me know if you find anything odd or plain wrong.
|
||||
|
||||
Setup
|
||||
-----
|
||||
|
||||
The best way to set up a new Vue 3 project is by installing and using the [vue-cli](https://cli.vuejs.org/).
|
||||
|
||||
|
||||
|
||||
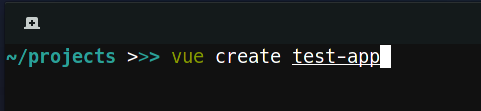
Run `vue create <name>` to set up a new project.
|
||||
|
||||
This command will generate a new project inside the `test-app` directory and create the basic structure. Note that you will have to select Vue 3 and TypeScript from the `Manually select features` option at the beginning, as it is still marked as experimental.
|
||||
|
||||

|
||||
|
||||
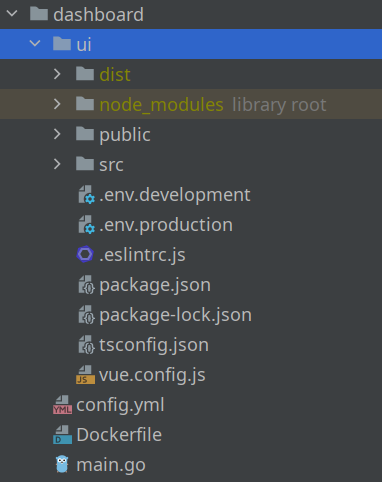
Out-of-the-box project structure of a new Vue 3 project.
|
||||
|
||||
Nothing surprising so far, but what really astonished me was how well everything works out of the box. I used to have two commands, one for building the Vue app itself and one to compile the Sass files. With this new setup, I could just place the files inside the `public` directory, and they would be automatically compiled to CSS.
|
||||
|
||||
The only changes I made were removing the `assets` folder and adding a command to the `package.json` to rebuild when something changed (build is still used for the production release).
|
||||
|
||||

|
||||
|
||||
A very lean `package.json`.
|
||||
|
||||
I use to embed my apps inside a custom Go server, to have control over configuration, headers, how files are served, easier deployment, and to add some functionality of course. By default, the `build` and `watch` commands will put the compiled files into the `dist` folder, present inside the root directory. The app itself is a subdirectory of the Go server.
|
||||
|
||||
|
||||
|
||||
Before, I just served the whole UI directory, but this time I had to select the directories under `dist` to make it work.
|
||||
|
||||
```
|
||||
server.ServeStaticFiles(router, "/js/", "ui/dist/js")
|
||||
server.ServeStaticFiles(router, "/css/", "ui/dist/css")
|
||||
server.ServeStaticFiles(router, "/img/", "ui/dist/img")
|
||||
server.ServeStaticFiles(router, "/fonts/", "ui/dist/fonts")
|
||||
router.HandleFunc("/favicon.ico", func(w http.ResponseWriter, r *http.Request) {
|
||||
http.ServeFile(w, r, "ui/dist/favicon.ico")
|
||||
})
|
||||
router.PathPrefix("/").HandlerFunc(func(w http.ResponseWriter, r *http.Request) {
|
||||
http.ServeFile(w, r, "ui/dist/index.html")
|
||||
})
|
||||
```
|
||||
|
||||
Note that each sub-directory of `ui/public` will create a directory inside `dist`, so you need to add it to the router in Go. `favicon` and `index.html` are the only special files I have so far. The index is served last, as it needs to be sent no matter what page the visitor is on. If someone visits `yourdomain.com/foo/bar` the server would otherwise try to find an index file inside `foo/bar`.
|
||||
|
||||
The Composition API
|
||||
-------------------
|
||||
|
||||
You might have heard about the Composition API already. It's a new way to define the structure and behavior of a component, living alongside the _traditional_ way of defining a component using the object notation. I started out setting the goal to just use the Composition API, as the videos I've seen about it looked very promising. You can still use the traditional way to define your components, but so far, I'm very pleased with it. In case you plan to upgrade from Vue 2, you don't need to re-write everything. But if you start a new project, I would recommend you go ahead and use it right from the beginning.
|
||||
|
||||
I fell in love with it when I had to implement multiple dropdowns. Here is an example from Pirsch, when I built the menu and had to add four dropdowns, which are functionality-wise all the same.
|
||||
|
||||

|
||||
|
||||
An early version of Pirsch's menu.
|
||||
|
||||
There is a dropdown for the domain, the resources, the time frame, and on your account. Functionally they're all the same. You click on the menu entry and it opens up. If you click anywhere outside the dropdown, it will close. One way to approach this problem would be to create one component and reuse it everywhere, but in this case, the HTML structure is slightly different. With the new Composition API, you can outsource this problem into its own file and function and just use it inside the components you need it.
|
||||
|
||||
```
|
||||
import {ref, Ref} from "vue";
|
||||
|
||||
// This defines which attributes and functions will be available to the component.
|
||||
interface Dropdown {
|
||||
dropdownElement: Ref<HTMLElement>
|
||||
dropdown: Ref<boolean>
|
||||
toggleDropdown(): void
|
||||
}
|
||||
|
||||
// And this is the re-usable function which will be called from the components.
|
||||
export function useDropdown(): Dropdown {
|
||||
const dropdownElement = ref(document.createElement("div"));
|
||||
const dropdown = ref(false);
|
||||
|
||||
function toggleDropdown() {
|
||||
dropdown.value = !dropdown.value;
|
||||
}
|
||||
|
||||
window.addEventListener("mouseup", e => {
|
||||
const element = dropdownElement.value;
|
||||
|
||||
if(/* ... */) {
|
||||
dropdown.value = false;
|
||||
}
|
||||
});
|
||||
|
||||
return {
|
||||
dropdownElement,
|
||||
dropdown,
|
||||
toggleDropdown
|
||||
};
|
||||
}
|
||||
```
|
||||
|
||||
As an example, this is the domain selection you can see on the screenshot above.
|
||||
|
||||
```
|
||||
<template>
|
||||
<div class="selection cursor-pointer" v-on:click="toggleDropdown" ref="dropdownElement">
|
||||
<span>{{"{{"}}activeDomain.hostname{{"}}"}}</span>
|
||||
<div class="dropdown" v-show="dropdown">
|
||||
<div v-for="domain in domains"
|
||||
:key="domain.id"
|
||||
v-on:click="switchDomain(domain)">{{"{{"}}domain.hostname{{"}}"}}</div>
|
||||
</div>
|
||||
</div>
|
||||
</template>
|
||||
|
||||
<script lang="ts">
|
||||
import /* ... */;
|
||||
|
||||
export default defineComponent({
|
||||
setup() {
|
||||
/* ... */
|
||||
|
||||
return {
|
||||
...useDropdown(),
|
||||
/* ... */
|
||||
};
|
||||
}
|
||||
});
|
||||
</script>
|
||||
```
|
||||
|
||||
All it takes is to add the function to the return statement of the setup function and boom! You can use the functionality inside the template. I have more examples like this, but I think you get the idea.
|
||||
|
||||
Component Structure
|
||||
-------------------
|
||||
|
||||
Another major benefit of the Composition API is, that you can now structure the code the way you want it. A component might take up hundreds of lines, depending on the complexity of your app (which should not happen that easily anymore, thanks to the Composition API) and you had to separate the data, methods, and other parts in a certain way. Editing large components naturally included a lot of scrolling and not seeing the data you were working with inside a method for example. Now, however, you can define the data right above the function you're using it in and mix it up. So instead of having something like this.
|
||||
|
||||
```
|
||||
<template>
|
||||
<!-- lots of code -->
|
||||
</template>
|
||||
|
||||
<script>
|
||||
import /* ... */;
|
||||
|
||||
export default {
|
||||
data() {
|
||||
return {
|
||||
foo: 42,
|
||||
/* far away from each other! */
|
||||
bar: ""
|
||||
};
|
||||
},
|
||||
/* maybe even more code */
|
||||
methods: {
|
||||
methodA() {
|
||||
this.foo++;
|
||||
},
|
||||
/* 500 lines of code */
|
||||
methodB() {
|
||||
this.bar = "Hello World!";
|
||||
}
|
||||
}
|
||||
}
|
||||
</script>
|
||||
```
|
||||
|
||||
You can now keep it easier to read.
|
||||
|
||||
```
|
||||
<template>
|
||||
<!-- lots of code -->
|
||||
</template>
|
||||
|
||||
<script lang="ts">
|
||||
import /* ... */;
|
||||
|
||||
export default defineComponent({
|
||||
setup() {
|
||||
const foo = ref(42);
|
||||
|
||||
function methodA() {
|
||||
foo.value++;
|
||||
}
|
||||
|
||||
/* 500 lines of code */
|
||||
|
||||
const bar = ref("");
|
||||
|
||||
function methodB() {
|
||||
bar.value = "Hello World!";
|
||||
}
|
||||
|
||||
return {
|
||||
foo,
|
||||
methodA,
|
||||
bar,
|
||||
methodB
|
||||
};
|
||||
}
|
||||
});
|
||||
</script>
|
||||
|
||||
```
|
||||
|
||||
And you might not even need to expose all data to the template. Imagine `foo` just being used internally. You still would have had to define that in `data` to access it. Now, you can just use a regular variable inside `setup`.
|
||||
|
||||
Generics With Typescript
|
||||
------------------------
|
||||
|
||||
Another moment I felt pretty good about my choice using TypeScript, was when I had to implement lists. Lists are often used to display data that would otherwise be in a table. They usually consist of "cards" in my apps, showing what it is and some additional fields and buttons to edit or remove them from the list.
|
||||
|
||||

|
||||
|
||||
I know this doesn't look very nice at the moment...
|
||||
|
||||
As lists are used across the page, I didn't want to re-implement them over and over again. You probably can guess that I used the composition API to implement the behavior, but this time it had to be generic.
|
||||
|
||||
TypeScript strength is to... you know... check types. So we want to build a type save reusable function. As you can see above, it needs to support the `User` type, and there is the `Client` type too. To do that, you can make use of generics.
|
||||
|
||||
```
|
||||
interface ListEntry {
|
||||
id: number
|
||||
}
|
||||
|
||||
interface List<T extends ListEntry> {
|
||||
/* ... */
|
||||
}
|
||||
|
||||
export function useList<T extends ListEntry>(): List<T> {
|
||||
const entries = ref<T[]>([]);
|
||||
const selectedEntry = ref<T>();
|
||||
|
||||
/* */
|
||||
|
||||
return {
|
||||
entries,
|
||||
selectedEntry,
|
||||
/* ... */
|
||||
};
|
||||
}
|
||||
```
|
||||
|
||||
The import part here is the `ListEntry` which defines an interface for all entities in my application. They all have an ID, which is used for the `:key` attribute in Vue and also to add and remove entries from the list. Here is how you would make use of it.
|
||||
|
||||
```
|
||||
setup() {
|
||||
const {entries, addEntry, removeEntry /* ... */} = useList<User>();
|
||||
|
||||
/* ... */
|
||||
|
||||
return {
|
||||
entries,
|
||||
addEntry,
|
||||
removeEntry,
|
||||
/* ... */
|
||||
};
|
||||
}
|
||||
```
|
||||
|
||||
Templating
|
||||
----------
|
||||
|
||||
The templating stayed mostly the same, but there are a few changes which made me enjoy Vue 3 even more. One that stood out to me was, that you no longer need to have a root element for all of your components. So defining the template of a component like this is fine.
|
||||
|
||||
```
|
||||
<template>
|
||||
<h2>Email</h2>
|
||||
<form v-on:submit.prevent="save">
|
||||
<FormInput label="Email Address" name="email" type="email" v-model="email" :err="validationError('email')" />
|
||||
<FormSubmit value="Save" />
|
||||
</form>
|
||||
</template>
|
||||
|
||||
<script lang="ts">
|
||||
/* ... */
|
||||
</script>
|
||||
```
|
||||
|
||||
This might not seem significant at first glance, but it sometimes got annoying in Vue 2 that you had to add a root element artificially to your component, even though it wasn't required for styling nor structure.
|
||||
|
||||
Conclusion
|
||||
----------
|
||||
|
||||
There is a lot more I could talk about, like having a linter to keep your code clean, but I think this is enough for now. I might write a follow-up when I have more experience with Vue 3 and TypeScript. I refused to make the switch to what is probably considered a best practice for quite some time. If you're someone like me who needs to know how everything works, even the project setup, make sure you don't waste time doing that and spend it on building something useful instead.
|
||||
|
||||
In case you got inspired to try out Vue 3 now, you can read the [introduction](https://v3.vuejs.org/guide/migration/introduction.html#render-function), which shows the major and minor differences between Vue 2 and 3 far better than I could.
|
||||
250
static/blog/wildcard-ssl-certificates.md
Normal file
250
static/blog/wildcard-ssl-certificates.md
Normal file
@@ -0,0 +1,250 @@
|
||||
**Published on 7. July 2020**
|
||||
|
||||
> _This post was originally published on Medium a while ago. I just added it to my blog for completeness._
|
||||
|
||||

|
||||
|
||||
Image by [CommitStrip](http://www.commitstrip.com/en/2016/06/13/the-end-of-an-expensive-era/).
|
||||
|
||||
When building web applications on top of Kubernetes from a certain point on you will want to make them accessible to the public. Having an SSL certificate is crucial for today's web applications to ensure traffic send between your cluster and your clients is encrypted.
|
||||
|
||||
In this article, I will show you how to receive a [wildcard SSL certificate](https://en.wikipedia.org/wiki/Wildcard_certificate) from [Let’s Encrypt](https://letsencrypt.org/) using a DNS01 challenge, cert-manager, and the [ACME DNS server](https://github.com/joohoi/acme-dns).
|
||||
|
||||
I will assume you have a cluster up and running with [Helm](https://helm.sh/) installed, exposing some sort of website or service through Ingress and basic knowledge about how to configure Kubernetes objects and Docker. This guide follows a top to bottom approach, which means we will start setting up Ingress first and add everything required to successfully obtain a certificate. Make sure you read completely through it before you start implementing your own solution.
|
||||
|
||||
What is a DNS01 challenge and ACME?
|
||||
-----------------------------------
|
||||
|
||||
DNS01 is a certificate authority (CA) challenge method to prove that you are the owner of a specific domain. While using an HTTP01 challenge only proves that you are the owner of a part of a domain (the top-level domain or a subdomain), a DNS01 challenge looks up your DNS configuration to prove that you control the whole domain. This allows CAs, like Let’s Encrypt, to issue wildcard certificates that are valid for all subdomains and your top-level domain. This is especially useful if subdomains are dynamically created like for team or project names in SaaS projects.
|
||||
|
||||
ACME is the Automatic Certificate Management Environment protocol and does exactly what it says. It significantly simplifies the process of obtaining SSL certificates and was specifically designed for Let’s Encrypt. It exchanges JSON objects through HTTPS to validate a certificate request.
|
||||
|
||||
Kubernetes Ingress SSL certificate setup
|
||||
----------------------------------------
|
||||
|
||||
We start simply by instructing Ingress to consume a secret that contains the certificate we will provide later on. To achieve that, we need to modify its YAML:
|
||||
|
||||
```
|
||||
apiVersion: extensions/v1beta1
|
||||
kind: Ingress
|
||||
metadata:
|
||||
name: my-ingress
|
||||
annotations:
|
||||
kubernetes.io/ingress.class: "nginx"
|
||||
nginx.ingress.kubernetes.io/rewrite-target: /
|
||||
nginx.ingress.kubernetes.io/ssl-redirect: "true"
|
||||
nginx.ingress.kubernetes.io/force-ssl-redirect: "true"
|
||||
spec:
|
||||
tls:
|
||||
- hosts:
|
||||
- example.com
|
||||
secretName: ingress-certificate-secret
|
||||
rules:
|
||||
# ...
|
||||
```
|
||||
|
||||
By adding the _tls_ section we specified a secret to use for _example.com_. The secret does not exist yet, but will contain our certificates private and public key once it was obtained by cert-manager. The _ssl-redirect_ and _force-ssl-redirect_ annotations instruct Ingress to enforce SSL encryption on all requests. When clients try to reach your service or website through HTTP they will be redirected to HTTPS.
|
||||
|
||||
Setting up cert-manager
|
||||
-----------------------
|
||||
|
||||
cert-manager is an add-on to automate the management of SSL certificates inside a Kubernetes cluster. It obtains certificates using various sources and ensures they stay valid. When a certificate gets close to its end of life, cert-manager will try to renew it. This is important since Let’s Encrypt certificates are only valid for up to three months.
|
||||
|
||||
To get started with cert-manager we install it first. The easiest way to do that is through Helm (version 0.6 in this example, make sure you install the latest stable version):
|
||||
|
||||
```
|
||||
kubectl apply -f https://raw.githubusercontent.com/jetstack/cert-manager/release-0.6/deploy/manifests/00-crds.yaml
|
||||
helm install --name cert-manager --version v0.6.0 stable/cert-manager
|
||||
```
|
||||
|
||||
The first command creates a few new Kubernetes custom resources, including _Issuer_ and _Certificate_, which we will configure in a moment.
|
||||
|
||||
The second command installs cert-manager and spins up a new pod responsible for issuing certificates and renewing them if required. You can install it for a specific namespace only by providing the namespace argument to Helm.
|
||||
|
||||
Next, we create a _Certificate_ object:
|
||||
|
||||
```
|
||||
apiVersion: certmanager.k8s.io/v1alpha1
|
||||
kind: Certificate
|
||||
metadata:
|
||||
name: my-certificate
|
||||
spec:
|
||||
secretName: ingress-certificate-secret
|
||||
issuerRef:
|
||||
name: issuer-letsencrypt
|
||||
commonName: example.com
|
||||
dnsNames:
|
||||
- example.com
|
||||
- "*.example.com"
|
||||
acme:
|
||||
config:
|
||||
- dns01:
|
||||
provider: acmedns
|
||||
domains:
|
||||
- example.com
|
||||
- "*.example.com"
|
||||
```
|
||||
|
||||
The kind is _Certificate_, one of cert-managers custom types we applied before. _secretName_ tells cert-manager the name of the secret to create when the certificate was successfully obtained. This must be identical to the secret name we configured for Ingress. We do not need to create it manually. _issuerRef_ references the _Issuer_ used to get the certificate which we will set up next. _commonName_ represents the server name protected by our SSL certificate and must be equal to the domain or else browsers will complain about it. _dnsNames_ is a list of domains the certificate is valid for. Since we are trying to get a wildcard certificate, the second entry contains an asterisk to mark it valid for all subdomains. The part in the _acme_ section tells cert-manager which challenge type and provider to use. cert-manager supports HTTP01 and DNS01 challenge types as well as a [bunch of different providers](https://cert-manager.readthedocs.io/en/latest/tasks/acme/index.html), including ACME DNS which we use in this article.
|
||||
|
||||
To set up the issuer talking to our ACME DNS server we create another object of kind _Issuer_:
|
||||
|
||||
```
|
||||
apiVersion: certmanager.k8s.io/v1alpha1
|
||||
kind: Issuer
|
||||
metadata:
|
||||
name: issuer-letsencrypt
|
||||
spec:
|
||||
acme:
|
||||
server: https://acme-v02.api.letsencrypt.org/directory
|
||||
email: yourname@example.com
|
||||
privateKeySecretRef:
|
||||
name: account-private-key-secret
|
||||
dns01:
|
||||
providers:
|
||||
- name: acmedns
|
||||
acmedns:
|
||||
host: https://acme.example.com
|
||||
accountSecretRef:
|
||||
name: certmanager-secret
|
||||
key: acmedns.json
|
||||
```
|
||||
|
||||
The acme section tells cert-manager that this is an ACME issuer. The server, email and privateKeySecretRef are used when the issuer contacts Let’s Encrypt to issue a certificate. If you like to check if that works before you get a production certificate, change the server URL to `https://acme-staging-v02.api.letsencrypt.org/directory` or else you might run into Let’s Encrypts certificate quota. The privateKeySecretRef will be created by cert-manager and stores your Let’s Encrypt private account key. The email meight be used by Let’s Encrypt to contact you or send warnings when your certificate is about to expire.
|
||||
|
||||
The _dns01_ section describes which ACME server the issuer will contact. This is our private ACME DNS server we will set up next. Set _host_ to the domain pointing to your ACME DNS server. I recommend configuring a custom subdomain in your DNS settings, but you can use a static IP address as well. The _accountSecretRef_ is a Kubernetes secret and must be created manually. It must contain a JSON file with account information for the ACME server. In our case it looks like this:
|
||||
|
||||
```
|
||||
{
|
||||
"example.com": {
|
||||
"username": "<username>",
|
||||
"password": "<password>",
|
||||
"fulldomain": "<generated>.acme.example.com",
|
||||
"subdomain": "<generated>",
|
||||
"allowfrom": []
|
||||
},
|
||||
"*.example.com": {
|
||||
"username": "<username>",
|
||||
"password": "<password>",
|
||||
"fulldomain": "<generated>.acme.example.com",
|
||||
"subdomain": "<generated>",
|
||||
"allowfrom": []
|
||||
}
|
||||
}
|
||||
```
|
||||
|
||||
As you can see it contains the domains we have specified, a username and password as well as two generated values for each entry. Usually, ACME DNS is an interactive system where you sign up and receive the CNAME information you need to create in your DNS settings via its REST API. Since cert-manager handles that for us, it needs to know the account information in advance. The required data will be provided by the ACME DNS server after we have set it up and registered an account. Once we have done that, you can put the JSON file into a new secret called _certmanager-secret_ with _acmedns.json_ as its key.
|
||||
|
||||
Setting up the ACME DNS server
|
||||
------------------------------
|
||||
|
||||
We use Docker and Compose to set up our ACME DNS server. For this purpose, create a new virtual machine outside of the cluster and install Docker and Compose. It is necessary to allow incoming DNS requests on port 53, which would collide with Kubernete's own DNS service inside the cluster. Make sure you add a firewall rule to allow incoming traffic to reach your server too. Depending on your VM installation, port 53 might be blocked by systemd-resolved. In that case, change the listening interface in the [server configuration](https://github.com/joohoi/acme-dns#configuration) or disable port 53 for systemd-resolved (add line _DNSStubListener=no_ to _/etc/systemd/resolved.conf_). If you like to use Postgres instead of sqlite3, set it up on your VM or elsewhere or use an existing installation and make sure you can connect to it from your VM (I use a managed solution on Google Cloud).
|
||||
|
||||
To start ACME DNS through Compose, create a docker-compose.yml somewhere on your VM:
|
||||
|
||||
```
|
||||
version: '3'
|
||||
services:
|
||||
acmedns:
|
||||
restart: always
|
||||
image: joohoi/acme-dns
|
||||
ports:
|
||||
- "443:443"
|
||||
- "127.0.0.1:53:53"
|
||||
- "127.0.0.1:53:53/udp"
|
||||
- "80:80"
|
||||
volumes:
|
||||
- /acmedns:/etc/acme-dns:ro
|
||||
```
|
||||
|
||||
This pulls the latest ACME DNS image and starts listening on port 443/80 for incoming request to the API, as well as port 53 for incoming TXT DNS requests required to fulfil DNS01 challenges. Note that we added a volume in read only mode to configure ACME DNS. Copy the configuration template from the [GitHub repository](https://github.com/joohoi/acme-dns) and edit it to fit your needs. It must be placed inside the _/acmedns_ directory on your server.
|
||||
|
||||
Here are some changes I made for the installation:
|
||||
|
||||
```
|
||||
# listen to incoming traffic instead of localhost
|
||||
listen = "0.0.0.0:53"
|
||||
# the (sub-)domain we use for our server as well as the zone name
|
||||
domain = "acme.example.com"
|
||||
nsname = "acme.example.com"
|
||||
# A record pointing to your VM as well as an
|
||||
# NS record specifying that the server is responsible for all subdomains (e.g. foobar.acme.example.com)
|
||||
records = [
|
||||
"acme.exmaple.com. A <static IP of your VM>",
|
||||
"acme.exmaple.com. NS acme.example.com.",
|
||||
]
|
||||
# listen on port 443 for encrypted API requests
|
||||
port = "443"
|
||||
# obtain a certificate from Let's Encrypt
|
||||
tls = "letsencrypt"
|
||||
```
|
||||
|
||||
Setting _tls_ to _letsencrypt_ ensures our ACME DNS server issues its own SSL certificate for the REST API so that cert-manager does not obtain certificates from an unsecure source.
|
||||
|
||||
Now that we have our server up and running, we create an account and get the information required for the _acmedns.json_ we have created earlier (use curl, Postman, … you name it):
|
||||
|
||||
```
|
||||
POST acme.example.com/register
|
||||
```
|
||||
|
||||
The response looks something like this:
|
||||
|
||||
```
|
||||
{
|
||||
"allowfrom": [],
|
||||
"fulldomain": "8e5700ea-a4bf-41c7-8a77-e990661dcc6a.acme.example.com",
|
||||
"password": "htB9mR9DYgcu9bX_afHF62erXaH2TS7bg9KW3F7Z",
|
||||
"subdomain": "8e5700ea-a4bf-41c7-8a77-e990661dcc6a",
|
||||
"username": "c36f50e8-4632-44f0-83fe-e070fef28a10"
|
||||
}
|
||||
```
|
||||
|
||||
Extract the values required to fill out the blanks we have left in the _acmedns.json_ and create the secret for it.
|
||||
|
||||
Configuring your DNS
|
||||
--------------------
|
||||
|
||||
To allow Let’s Encrypt to validate DNS01 challenges against our ACME DNS server we have to make some changes to our DNS configuration. For the ACME DNS server we create two new entries:
|
||||
|
||||
```
|
||||
A auth <server-ip>
|
||||
NS auth.example.com auth.example.com
|
||||
```
|
||||
|
||||
This ensures DNS name resolution requests are handled by our ACME DNS server and marks it responsible for all subdomains of _auth.example.com_. When Let’s Encrypt tries to validate that we are the owner of _example.com_, it will look up a TXT record for that domain. To make sure it will look for it on our ACME DNS server rather than our primary DNS server we create a CNAME record pointing to it:
|
||||
|
||||
```
|
||||
CNAME _acme-challenge 312ecaf7-3ae5-40f3-8559-393e73659a96.auth.example.com.
|
||||
```
|
||||
|
||||
Testing
|
||||
-------
|
||||
|
||||
You should now have a nice green lock in your browser bar when visiting your website or service.
|
||||
|
||||
In case you don’t, check the logs of your ACME DNS server, that it serves the DNS TXT record (use one of the online tools) and the status of the _Ingress_, _Issuer_ and _Certificate_ Kubernetes objects we have created. You can use the Docker and Kubernetes log command and inspect the created objects. For example, this is what the _Certificate_ and _Issuer_ objects should look like:
|
||||
|
||||
```
|
||||
# check the certificate got issued and is not expired
|
||||
kubectl describe certificate my-certificate
|
||||
# output:
|
||||
Status:
|
||||
Conditions:
|
||||
Last Transition Time: 2019-03-07T15:18:29Z
|
||||
Message: Certificate is up to date and has not expired
|
||||
Reason: Ready
|
||||
Status: True
|
||||
Type: Ready
|
||||
# check the issuer can connect to ACME DNS and the account was registered
|
||||
kubectl describe issuer issuer-letsencrypt
|
||||
# output:
|
||||
Status:
|
||||
Acme:
|
||||
Uri: https://acme-v02.api.letsencrypt.org/acme/acct/50103972
|
||||
Conditions:
|
||||
Last Transition Time: 2019-01-26T13:32:59Z
|
||||
Message: The ACME account was registered with the ACME server
|
||||
Reason: ACMEAccountRegistered
|
||||
Status: True
|
||||
Type: Ready
|
||||
```
|
||||
BIN
static/web/favicon.png
Normal file
BIN
static/web/favicon.png
Normal file
Binary file not shown.
|
After Width: | Height: | Size: 1.3 KiB |
@@ -1 +1 @@
|
||||
@font-face{font-family:"Open Sans";font-style:italic;font-weight:normal;font-stretch:100%;font-display:swap;src:url("../font/OpenSans-Italic.ttf") format("truetype")}@font-face{font-family:"Open Sans";font-style:normal;font-weight:normal;font-stretch:100%;font-display:swap;src:url("../font/OpenSans-Regular.ttf") format("truetype")}@font-face{font-family:"Open Sans";font-style:normal;font-weight:bold;font-stretch:100%;font-display:swap;src:url("../font/OpenSans-Bold.ttf") format("truetype")}@font-face{font-family:"Open Sans";font-style:italic;font-weight:bold;font-stretch:100%;font-display:swap;src:url("../font/OpenSans-BoldItalic.ttf") format("truetype")}*{box-sizing:border-box;font-family:"Open Sans",sans-serif;font-size:18px;line-height:1.5;color:#0f0f0f}body{padding:80px 40px;max-width:1000px;margin:0 auto}h1,h2{font-size:32px;margin:0 0 40px 0;font-weight:normal}h1 a,h2 a{font-size:32px}h2{font-size:26px}a{text-decoration:none;transition:all .3s;color:#82b3db}a:hover{color:#0f0f0f}nav{display:flex;justify-content:space-between;align-items:center;margin:0 0 80px 0}nav ul{display:flex;gap:20px;margin:0;padding:0}nav ul li{list-style:none;margin:0;padding:0}nav ul li a{color:#0f0f0f}nav ul li a:hover{color:#82b3db}nav .contact{display:inline-block;padding:8px 16px;border-radius:8px;border:2px solid #82b3db;color:#0f0f0f;transition:all .3s;color:#82b3db}nav .contact:hover{background:#82b3db;color:#fff}section{margin:0 0 80px 0}footer{margin:0 0 80px 0;padding:40px 0;border-style:solid;border-width:2px 0 0 0;border-color:#e6e6e6}.intro article{display:flex;gap:40px;justify-content:flex-start;align-items:center}.intro article h1{margin:0}.intro article img{max-width:256px;max-height:256px;aspect-ratio:1;border-radius:8px}/*# sourceMappingURL=main.css.map */
|
||||
@font-face{font-family:"Open Sans";font-style:italic;font-weight:normal;font-stretch:100%;font-display:swap;src:url("../font/OpenSans-Italic.ttf") format("truetype")}@font-face{font-family:"Open Sans";font-style:normal;font-weight:normal;font-stretch:100%;font-display:swap;src:url("../font/OpenSans-Regular.ttf") format("truetype")}@font-face{font-family:"Open Sans";font-style:normal;font-weight:bold;font-stretch:100%;font-display:swap;src:url("../font/OpenSans-Bold.ttf") format("truetype")}@font-face{font-family:"Open Sans";font-style:italic;font-weight:bold;font-stretch:100%;font-display:swap;src:url("../font/OpenSans-BoldItalic.ttf") format("truetype")}*{box-sizing:border-box;font-family:"Open Sans",sans-serif;font-size:18px;line-height:1.5;color:#0f0f0f}body{margin:0;padding:0}h1,h2{font-size:32px;margin:0 0 40px 0;font-weight:normal}h1 a,h2 a{font-size:32px}h2{margin:40px 0;font-size:26px}a{text-decoration:none;transition:all .3s;color:#717171}a:hover{color:#0f0f0f}p{margin:20px 0}img{display:block;max-width:80%;margin:40px auto}pre{max-width:80%;margin:40px auto;padding:20px;border-width:1px 1px 1px 2px;border-style:solid;border-color:#c0d9f0;border-radius:8px;overflow-x:auto;font-size:14px}code{font-family:"Courier New",Courier,monospace}hr{margin:40px 0;height:2px;background:#e6e6e6;border-width:0}nav{padding:80px 40px;background:#c0d9f0}nav .content{display:flex;justify-content:space-between;align-items:center;max-width:1000px;margin:0 auto}nav .content ul{display:flex;gap:20px;margin:0;padding:0}nav .content ul li{list-style:none;margin:0;padding:0}nav .content ul li a{color:#0f0f0f}nav .content ul li a svg{fill:#0f0f0f;transition:all .3s}nav .content ul li a:hover{color:#717171}nav .content ul li a:hover svg{fill:#717171}nav .content .contact{display:inline-block;padding:8px 16px;border-radius:8px;border:2px solid #0f0f0f;color:#0f0f0f;transition:all .3s}nav .content .contact:hover{background:#0f0f0f;color:#fff}section{max-width:1080px;margin:80px auto 0 auto;padding:0 40px}footer{max-width:1080px;margin:80px auto 0 auto;padding:0 40px}footer .content{max-width:1000px;margin:0 auto;border-style:solid;border-width:2px 0 0 0;border-color:#e6e6e6;padding:40px 0}.intro{background:#c0d9f0;max-width:100%;padding:0 40px 80px 40px;margin:0}.intro article{max-width:1000px;margin:0 auto;display:flex;gap:40px;justify-content:flex-start;align-items:center}.intro article h1{margin:0}.intro article img{max-width:196px;max-height:196px;aspect-ratio:1;border-radius:8px}/*# sourceMappingURL=main.css.map */
|
||||
|
||||
@@ -1 +1 @@
|
||||
{"version":3,"sourceRoot":"","sources":["../../assets/scss/_font.scss","../../assets/scss/main.scss"],"names":[],"mappings":"AAAA,WACI,wBACA,kBACA,mBACA,kBACA,kBACA,0DAGJ,WACI,wBACA,kBACA,mBACA,kBACA,kBACA,2DAGJ,WACI,wBACA,kBACA,iBACA,kBACA,kBACA,wDAGJ,WACI,wBACA,kBACA,iBACA,kBACA,kBACA,8DC1BJ,EACC,sBACA,mCACA,eACA,gBACA,MATW,QAYZ,KACC,kBACA,iBACA,cAGD,MACC,eACA,kBACA,mBAEA,UACC,eAIF,GACC,eAGD,EACC,qBACA,mBACA,MAjCW,QAmCX,QACC,MAtCU,QA0CZ,IACC,aACA,8BACA,mBACA,kBAEA,OACC,aACA,SACA,SACA,UAEA,UACC,gBACA,SACA,UAEA,YACC,MA5DQ,QA8DR,kBACC,MA7DO,QAmEX,aACC,qBACA,iBACA,cAzEa,IA0Eb,yBACA,MA1EU,QA2EV,mBACA,MA1EU,QA4EV,mBACC,WA7ES,QA8ET,WAKH,QACC,kBAGD,OACC,kBACA,eACA,mBACA,uBACA,aA7FW,QAiGX,eACC,aACA,SACA,2BACA,mBAEA,kBACC,SAGD,mBACC,gBACA,iBACA,eACA,cAjHY","file":"main.css"}
|
||||
{"version":3,"sourceRoot":"","sources":["../../assets/scss/_font.scss","../../assets/scss/main.scss"],"names":[],"mappings":"AAAA,WACI,wBACA,kBACA,mBACA,kBACA,kBACA,0DAGJ,WACI,wBACA,kBACA,mBACA,kBACA,kBACA,2DAGJ,WACI,wBACA,kBACA,iBACA,kBACA,kBACA,wDAGJ,WACI,wBACA,kBACA,iBACA,kBACA,kBACA,8DCzBJ,EACC,sBACA,mCACA,eACA,gBACA,MAVW,QAaZ,KACC,SACA,UAGD,MACC,eACA,kBACA,mBAEA,UACC,eAIF,GACC,cACA,eAGD,EACC,qBACA,mBACA,MAnCW,QAqCX,QACC,MAvCU,QA2CZ,EACC,cAGD,IACC,cACA,cACA,iBAGD,IACC,cACA,iBACA,aACA,6BACA,mBACA,aAxDW,QAyDX,cA7Dc,IA8Dd,gBACA,eAGD,KACC,4CAGD,GACC,cACA,WACA,WAtEW,QAuEX,eAGD,IACC,kBACA,WA3EW,QA6EX,aACC,aACA,8BACA,mBACA,iBACA,cAEA,gBACC,aACA,SACA,SACA,UAEA,mBACC,gBACA,SACA,UAEA,qBACC,MAnGO,QAqGP,yBACC,KAtGM,QAuGN,mBAGD,2BACC,MA1GM,QA4GN,+BACC,KA7GK,QAoHV,sBACC,qBACA,iBACA,cAzHY,IA0HZ,yBACA,MA1HS,QA2HT,mBAEA,4BACC,WA9HQ,QA+HR,WAMJ,QACC,iBACA,wBACA,eAGD,OACC,iBACA,wBACA,eAEA,gBACC,iBACA,cACA,mBACA,uBACA,aAnJU,QAoJV,eAIF,OACC,WAxJW,QAyJX,eACA,yBACA,SAEA,eACC,iBACA,cACA,aACA,SACA,2BACA,mBAEA,kBACC,SAGD,mBACC,gBACA,iBACA,eACA,cAjLY","file":"main.css"}
|
||||
2
static/web/main.min.js
vendored
2
static/web/main.min.js
vendored
@@ -1 +1 @@
|
||||
(()=>{console.log("Hello from Shifu!");})();
|
||||
(()=>{console.log("Hi!");})();
|
||||
|
||||
7
tpl/footer.html
Normal file
7
tpl/footer.html
Normal file
@@ -0,0 +1,7 @@
|
||||
<footer>
|
||||
<div class="content">
|
||||
<p>Looking for more? Read my blog articles on <a href="https://pirsch.io/blog" target="_blank">Pirsch Analytics</a> and <a href="https://emvi.com/blog" target="_blank">Emvi</a>!</p>
|
||||
<p>If you have a business proposal for me, please use the <strong>Contact me</strong> button at the top.</p>
|
||||
<p>This page does not use cookies. <a href="/legal">Legal</a></p>
|
||||
</div>
|
||||
</footer>
|
||||
@@ -10,6 +10,7 @@
|
||||
<meta name="author" content="{{copy .Page .Content "author"}}" />
|
||||
<meta name="title" content="{{$title}}" />
|
||||
<meta name="description" content="{{copy .Page .Content "meta_description"}}" />
|
||||
<link rel="icon" type="image/png" href="/static/web/favicon.png">
|
||||
<link rel="canonical" href="{{.Page.CanonicalLink}}" />
|
||||
|
||||
{{range $language, $path := .Page.Path}}
|
||||
|
||||
@@ -1,46 +1,6 @@
|
||||
<nav>
|
||||
<div>
|
||||
<ul>
|
||||
<li>
|
||||
<a href="/">Home</a>
|
||||
</li>
|
||||
<li>
|
||||
<a href="/blog">Blog</a>
|
||||
</li>
|
||||
<li>
|
||||
<a href="https://github.com/Kugelschieber" target="_blank">GitHub</a>
|
||||
</li>
|
||||
<li>
|
||||
<a href="https://x.com/m5blum" target="_blank">Twitter/X</a>
|
||||
</li>
|
||||
<li>
|
||||
<a href="https://social.anoxinon.de/@m5blum" target="_blank">Mastodon</a>
|
||||
</li>
|
||||
</ul>
|
||||
</div>
|
||||
<div>
|
||||
<a href="mailto:marvin.blum@emvi.com" class="contact">Contact me</a>
|
||||
</div>
|
||||
</nav>
|
||||
|
||||
<section class="intro">
|
||||
<article>
|
||||
<h1>Hi, I'm Marvin, co-founder of <a href="https://pirsch.io" target="_blank">Pirsch Analytics</a> and <a href="https://emvi.com" target="_blank">Emvi</a>, software engineer, and open-source enthusiast.</h1>
|
||||
<img src="/static/img/me.jpg" alt="Picture" />
|
||||
</article>
|
||||
</section>
|
||||
|
||||
<section>
|
||||
<h2>TODO</h2>
|
||||
<ul>
|
||||
<li>About</li>
|
||||
<li>Skills</li>
|
||||
<li>Projects</li>
|
||||
<li>Work Experience</li>
|
||||
<li>Hire me!</li>
|
||||
</ul>
|
||||
</section>
|
||||
|
||||
<footer>
|
||||
<p>TODO Footer</p>
|
||||
</footer>
|
||||
|
||||
39
tpl/nav.html
Normal file
39
tpl/nav.html
Normal file
@@ -0,0 +1,39 @@
|
||||
<nav>
|
||||
<div class="content">
|
||||
<ul>
|
||||
<li>
|
||||
<a href="/">Home</a>
|
||||
</li>
|
||||
<li>
|
||||
<a href="/blog">Blog</a>
|
||||
</li>
|
||||
<li>
|
||||
<a href="https://github.com/Kugelschieber" target="_blank">
|
||||
GitHub
|
||||
<svg xmlns="http://www.w3.org/2000/svg" x="0px" y="0px" width="14" height="14" viewBox="0 0 48 48">
|
||||
<path d="M 40.960938 4.9804688 A 2.0002 2.0002 0 0 0 40.740234 5 L 28 5 A 2.0002 2.0002 0 1 0 28 9 L 36.171875 9 L 22.585938 22.585938 A 2.0002 2.0002 0 1 0 25.414062 25.414062 L 39 11.828125 L 39 20 A 2.0002 2.0002 0 1 0 43 20 L 43 7.2460938 A 2.0002 2.0002 0 0 0 40.960938 4.9804688 z M 12.5 8 C 8.3826878 8 5 11.382688 5 15.5 L 5 35.5 C 5 39.617312 8.3826878 43 12.5 43 L 32.5 43 C 36.617312 43 40 39.617312 40 35.5 L 40 26 A 2.0002 2.0002 0 1 0 36 26 L 36 35.5 C 36 37.446688 34.446688 39 32.5 39 L 12.5 39 C 10.553312 39 9 37.446688 9 35.5 L 9 15.5 C 9 13.553312 10.553312 12 12.5 12 L 22 12 A 2.0002 2.0002 0 1 0 22 8 L 12.5 8 z"></path>
|
||||
</svg>
|
||||
</a>
|
||||
</li>
|
||||
<li>
|
||||
<a href="https://x.com/m5blum" target="_blank">
|
||||
Twitter/X
|
||||
<svg xmlns="http://www.w3.org/2000/svg" x="0px" y="0px" width="14" height="14" viewBox="0 0 48 48">
|
||||
<path d="M 40.960938 4.9804688 A 2.0002 2.0002 0 0 0 40.740234 5 L 28 5 A 2.0002 2.0002 0 1 0 28 9 L 36.171875 9 L 22.585938 22.585938 A 2.0002 2.0002 0 1 0 25.414062 25.414062 L 39 11.828125 L 39 20 A 2.0002 2.0002 0 1 0 43 20 L 43 7.2460938 A 2.0002 2.0002 0 0 0 40.960938 4.9804688 z M 12.5 8 C 8.3826878 8 5 11.382688 5 15.5 L 5 35.5 C 5 39.617312 8.3826878 43 12.5 43 L 32.5 43 C 36.617312 43 40 39.617312 40 35.5 L 40 26 A 2.0002 2.0002 0 1 0 36 26 L 36 35.5 C 36 37.446688 34.446688 39 32.5 39 L 12.5 39 C 10.553312 39 9 37.446688 9 35.5 L 9 15.5 C 9 13.553312 10.553312 12 12.5 12 L 22 12 A 2.0002 2.0002 0 1 0 22 8 L 12.5 8 z"></path>
|
||||
</svg>
|
||||
</a>
|
||||
</li>
|
||||
<li>
|
||||
<a href="https://social.anoxinon.de/@m5blum" target="_blank">
|
||||
Mastodon
|
||||
<svg xmlns="http://www.w3.org/2000/svg" x="0px" y="0px" width="14" height="14" viewBox="0 0 48 48">
|
||||
<path d="M 40.960938 4.9804688 A 2.0002 2.0002 0 0 0 40.740234 5 L 28 5 A 2.0002 2.0002 0 1 0 28 9 L 36.171875 9 L 22.585938 22.585938 A 2.0002 2.0002 0 1 0 25.414062 25.414062 L 39 11.828125 L 39 20 A 2.0002 2.0002 0 1 0 43 20 L 43 7.2460938 A 2.0002 2.0002 0 0 0 40.960938 4.9804688 z M 12.5 8 C 8.3826878 8 5 11.382688 5 15.5 L 5 35.5 C 5 39.617312 8.3826878 43 12.5 43 L 32.5 43 C 36.617312 43 40 39.617312 40 35.5 L 40 26 A 2.0002 2.0002 0 1 0 36 26 L 36 35.5 C 36 37.446688 34.446688 39 32.5 39 L 12.5 39 C 10.553312 39 9 37.446688 9 35.5 L 9 15.5 C 9 13.553312 10.553312 12 12.5 12 L 22 12 A 2.0002 2.0002 0 1 0 22 8 L 12.5 8 z"></path>
|
||||
</svg>
|
||||
</a>
|
||||
</li>
|
||||
</ul>
|
||||
<div>
|
||||
<a href="mailto:marvin.blum@emvi.com" class="contact">Contact me</a>
|
||||
</div>
|
||||
</div>
|
||||
</nav>
|
||||
18
tpl/text.html
Normal file
18
tpl/text.html
Normal file
@@ -0,0 +1,18 @@
|
||||
{{$size := get .Content "size"}}
|
||||
{{$md := get .Content "markdown"}}
|
||||
|
||||
<section>
|
||||
{{if $size}}
|
||||
{{html (fmt "<%s>" $size)}}
|
||||
{{copy .Page .Content "headline"}}
|
||||
{{html (fmt "</%s>" $size)}}
|
||||
{{else}}
|
||||
<h2>{{copy .Page .Content "headline"}}</h2>
|
||||
{{end}}
|
||||
|
||||
{{if $md}}
|
||||
{{markdown $md .}}
|
||||
{{else}}
|
||||
{{html (copy .Page .Content "text")}}
|
||||
{{end}}
|
||||
</section>
|
||||
Reference in New Issue
Block a user